Building my website on Google Cloud Platform using WordPress and Google Kubernetes Engine
Why my own website?
Communication is a key skill in life and even more so for product management professionals. A product manager needs great communication skill to clearly communicate business ideas to executive leadership, interview customers and understand their needs, translate customer needs into technical specifications and communicate it to engineering and design, and communicate with cross functional teams like marketing, sales, operations, finance and legal to make sure everyone is at the same page and product delivery goes smoothly.
The importance of communication in product management can’t be understated. For me having structure and clarity of thoughts is essential to communicate effectively. Writing helps me with clarity and structure of thought. Added benefit of writing is that it helps in assimilating and consolidating thoughts which helps in retaining knowledge and making it easy to recall.
Coming from a STEM background, writing was never a focus. I therefore decided to write more often in order to improve my writing skills. Publishing my own blog was a natural progression to this idea. If I was going to write a blog, why not host my own website? It started as a fun project but I am happy with the progress I have made so far. I am hopeful that the ideas I share in my blog will be useful and informative for other people.
How to create a personal website?
There are many ways to create a personal website. Being a technology professional working in cloud computing I naturally wanted to host my own website on the cloud. I wanted to leverage autoscaling, fault tolerance and security features offered by the cloud therefore I built my website on Google Kubernetes Engine (GKE) on Google Cloud Platform (GCP). In this blog post I am going to focus on how to create a personal website on GCP using GKE and WordPress.
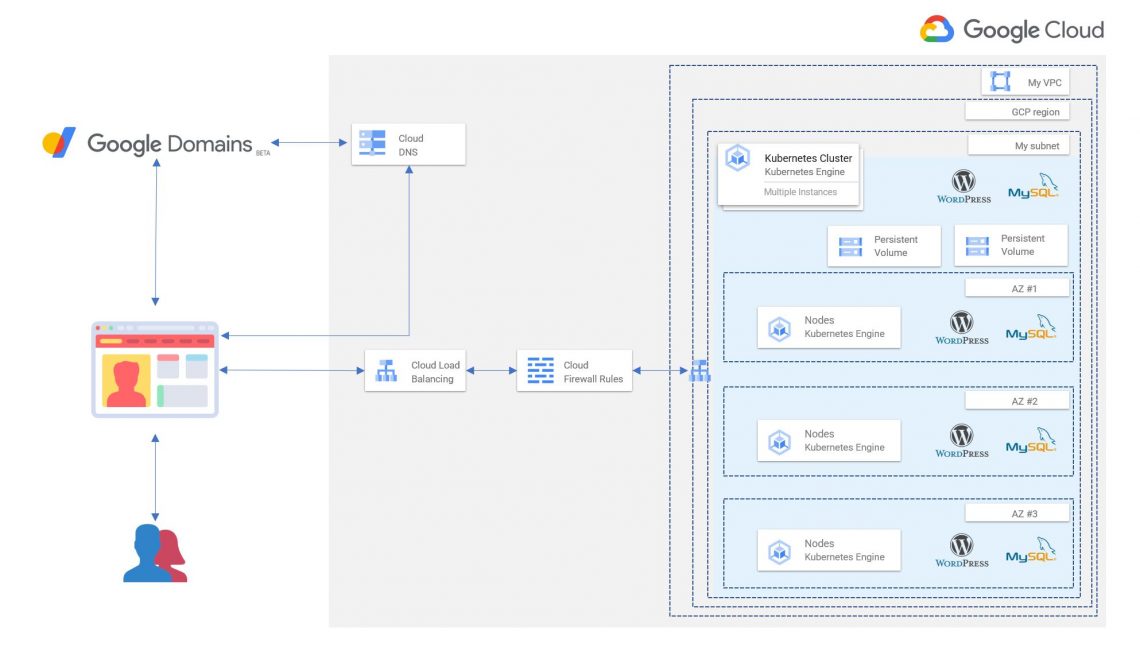
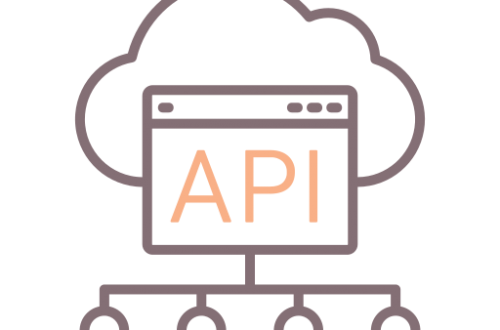
Before we dive deeper into the process to build the website below is a high level architecture of my website.
Deep dive into hosting website on Google Cloud using WordPress and Google Kubernetes Cluster:
I have broken down the overall process of hosting personal website on GCP using GKE and WordPress into following seven steps:
- Purchase a Domain: There are many websites which offer services to register a domain name. I used Google Domain to register my website. Similar services are offered by websites like godaddy.com, AWS route 53, etc. Registering a domain on google domain is fairly simple. Just search for the domain you would like to register. Then select the domain name, add it to cart and follow the checkout process.
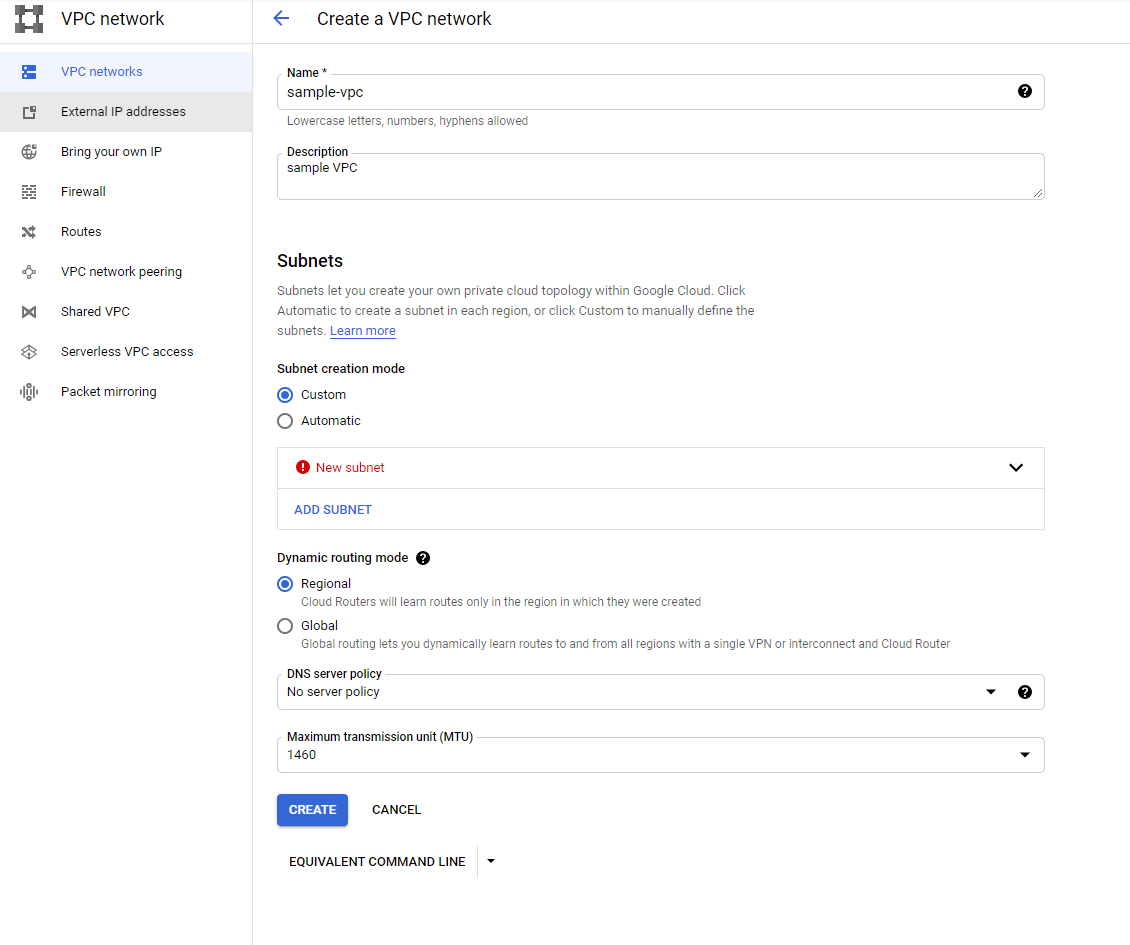
- Create VPC and Subnet: This is not a must have step however I would highly recommend to create a personal VPC and subnet. This will help in logical isolation of your resources and define firewall rules. Creating VPC is fairly simple. Give it a name, description and leave the rest of the default options on and click on create.
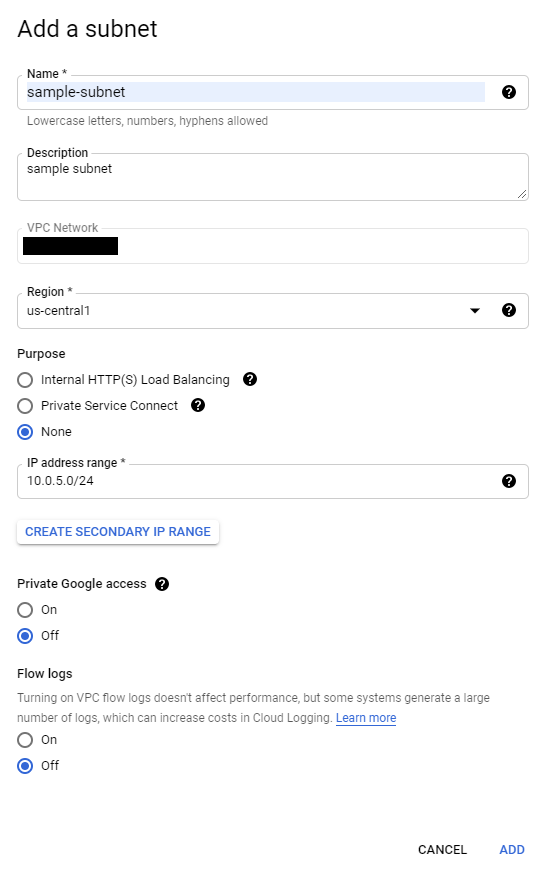
Once you have created a VPC, then go to details page for that VPC and add subnet as shown in image below.
- Update Firewall rules: I noticed that default firewall rules made my resources accessible from the internet. So I updated firewall rules to restrict access to SSH and RDP from only my personal IP address. I left http, https, and icmp ports accessible from the internet.
- Create a GKE cluster: For this project I created a regional GKE cluster, set up auto scaling, and defined machine configuration. This is shown in following images: Create a GKE cluster. I created a regional cluster but you can deploy in a single zone as well. Select the GCP region you want to deploy the GKE cluster in (make sure you created the vpc and subnet for that region).
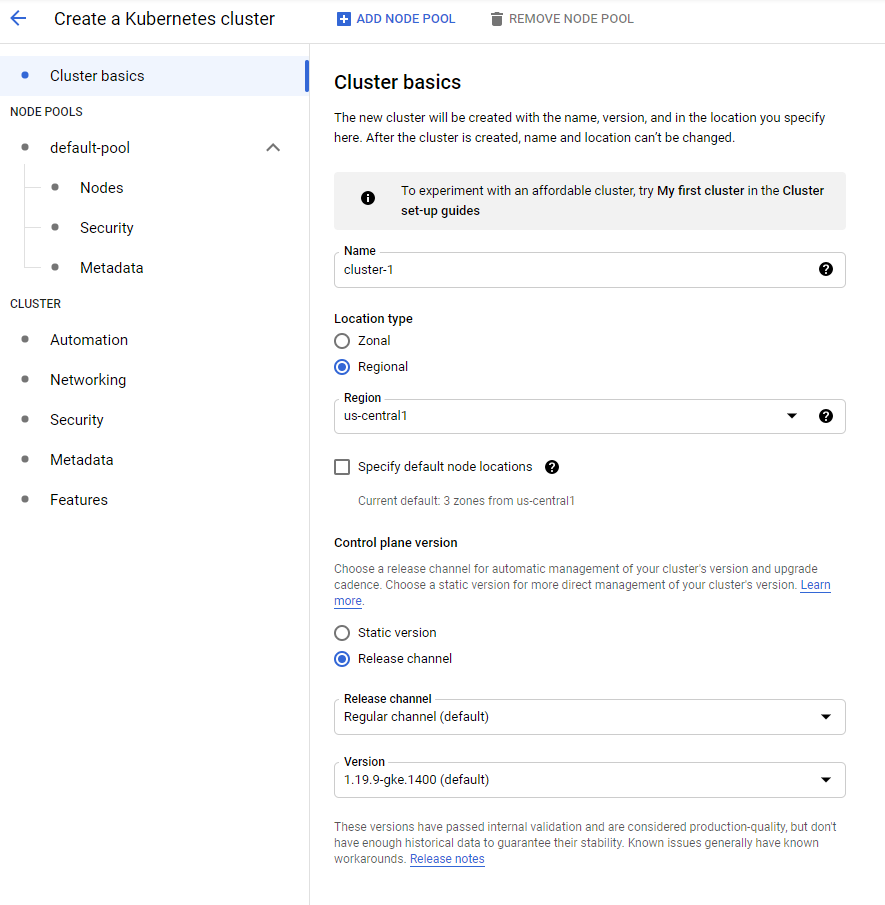
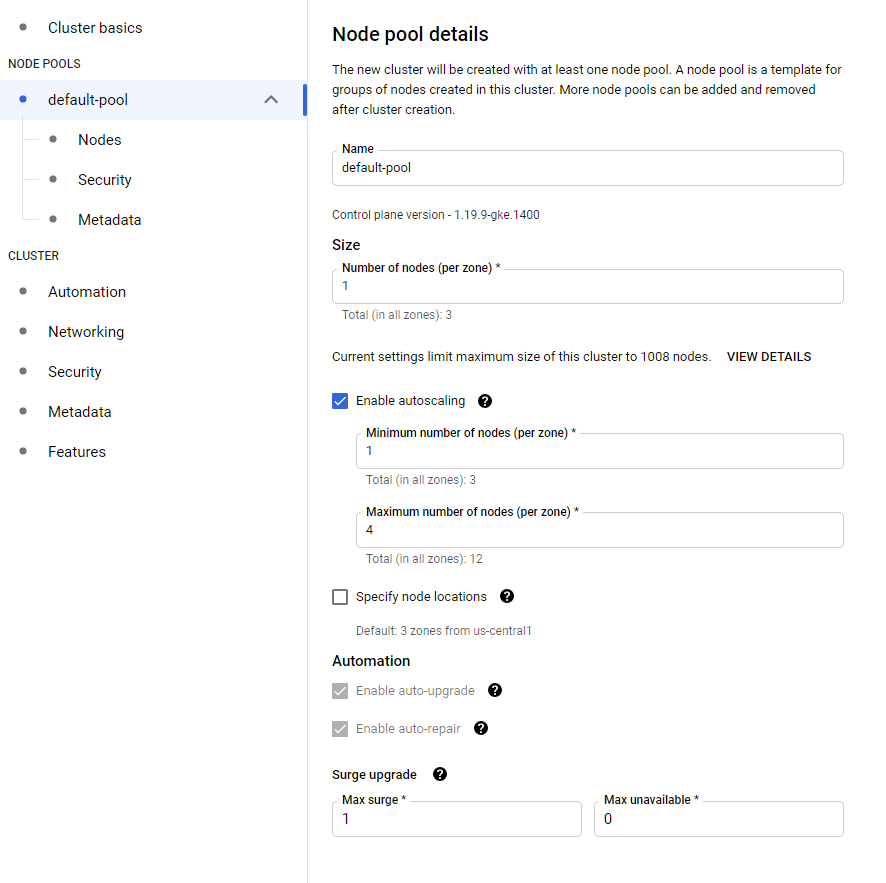
Once you have updated these details next go to the default pool. The default size is 3 nodes per zone. To save the cost I reduced it to one and I enabled auto scaling for minimum one node per zone to maximum of 4 nodes per zone. You can define these settings based on your availability needs, budget and expected traffic to the website.
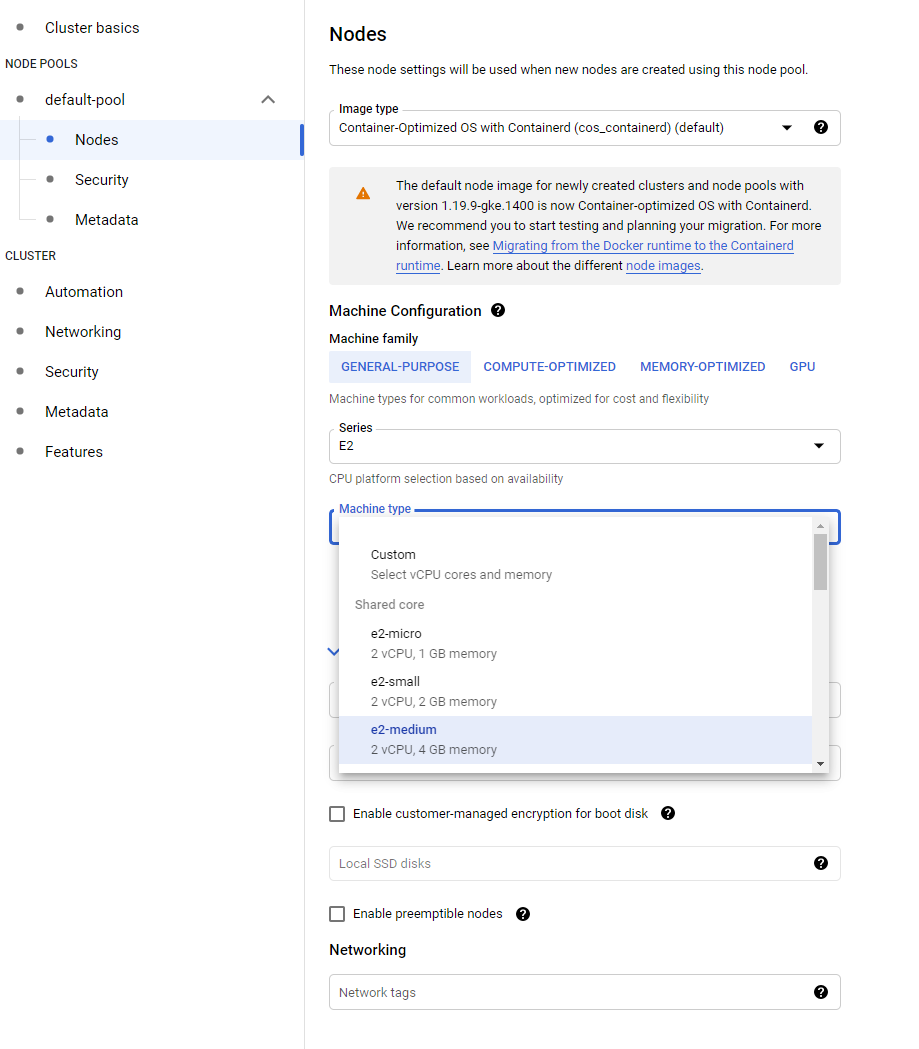
For the next step go to nodes and select the machine type you want. By default e2-medium is selected. I downgraded it to e2-small to reduce cost.
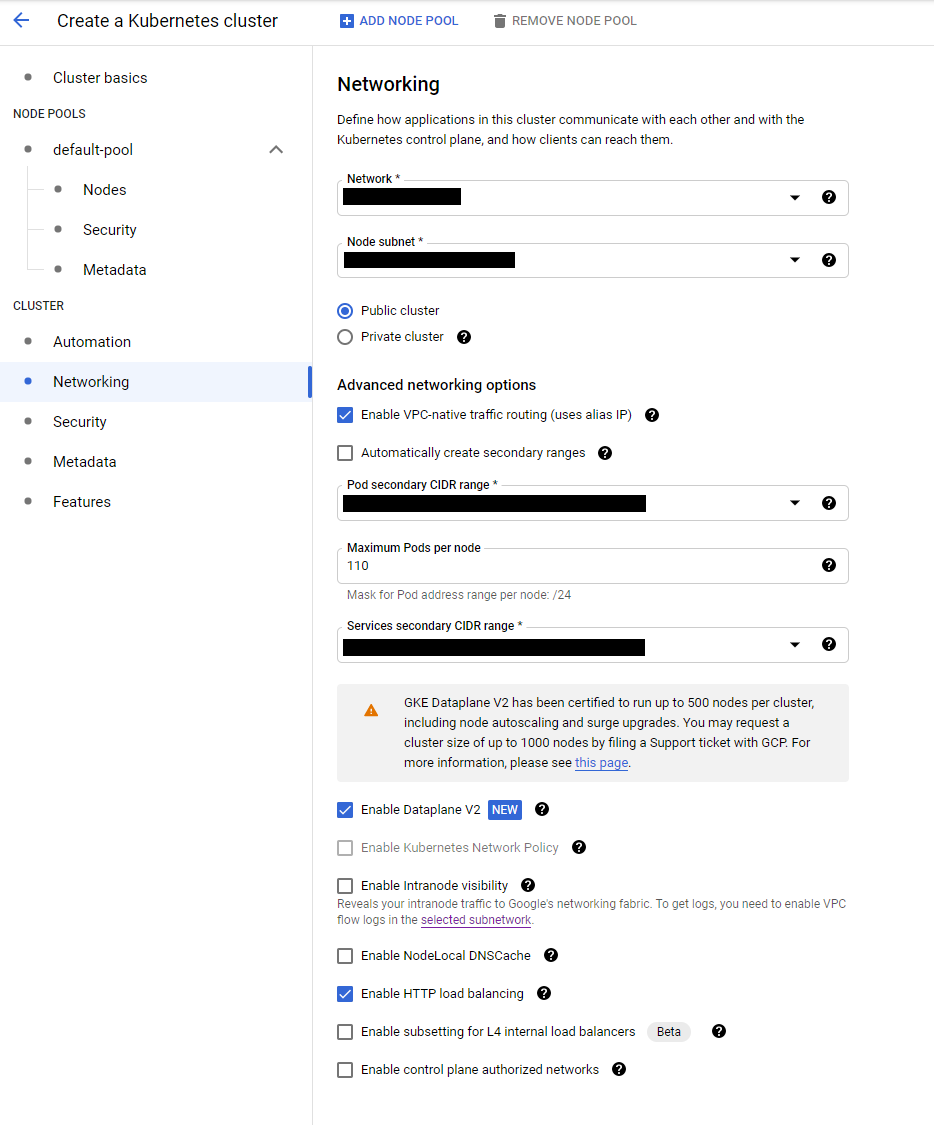
Next go to the network section and make sure to select the VPC and subnet you created. Disable the automatically create secondary range and enable dataplane V2.
At this point you can explore other sections or just click on create which will trigger the creation of the GKE cluster.
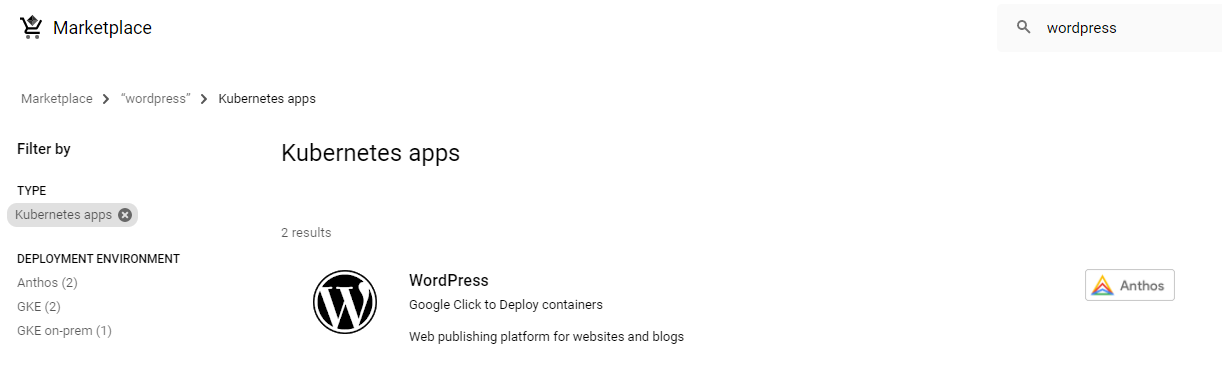
- Deploy WordPress: You can either manually deploy wordpress and mysql by following this guide or GitHub repo or use GCP marketplace to deploy wordpress. Google has made it fairly easy to deploy wordpress on the GKE cluster by publishing it on the marketplace. You can find this on marketplace by searching for wordpress and filtering it on kubernetes apps:
The deployment wizard should automatically select the cluster you have already created. I created a new namespace provided the app name and email address. I recommend not enabling the public IP address. After this step click on deploy and the wordpress app will be deployed.

- Ingress Load Balancer: Once wordpress is deployed we need to enable ingress traffic to the website and create a load balancer. For this go to services and ingress section in kubernetes engine and then go to details of wordpress-gke-app-wordpress-svc. Go to the YAML tab and then scroll to the bottom of the YAML. Edit the YAML and change the ClusterIP to NodePort and save the YAML. For the next step go back to services and ingress section select the wordpress-gke-app-wordpress-svc and click on create Ingress.
Ingress has three sections , backend, frontend and host and path rules.

For backend configuration make sure that the GKE cluster is selected.
In the host and path rules section select Advanced host and path rule (URL redirect, URL rewrite). Then select Redirect the client to a different host/path. For path redirect, select Prefix redirect and Redirect response code, select 301 — Moved Permanently. Mark HTTPS redirect, to Enable.
For frontend configuration configure http and https traffic. As part of https configuration select GCP managed certificate. This allows for SSL certificates to be generated for the website.
After this step go to load balancer and create a load balancer to redirect http traffic to https traffic. This way if someone types in http://yourwebsite.com then that person gets automatically redirected to https://yourwebsite.com.
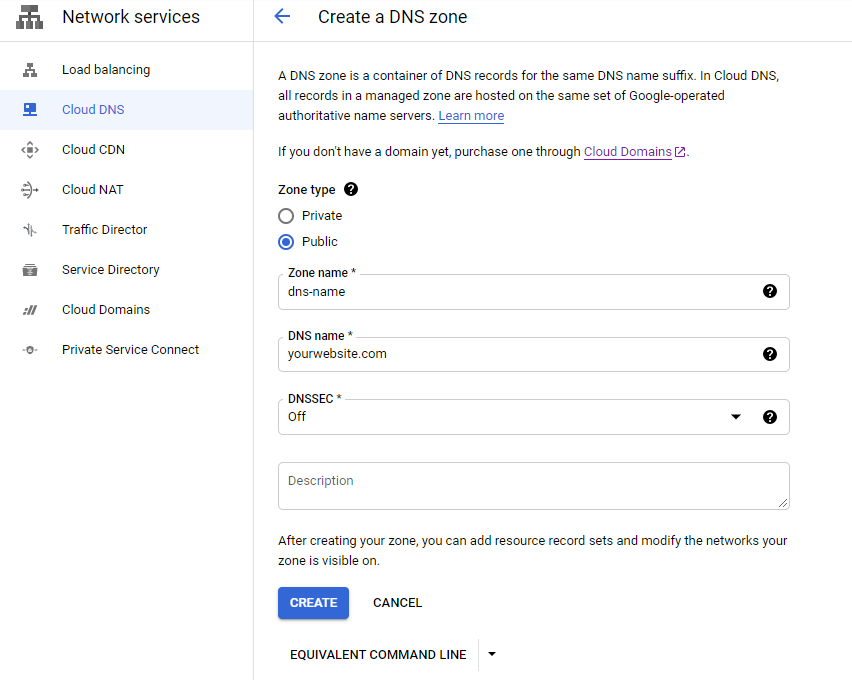
- Static IP and DNS configuration: Last step is to map the domain to the DNS. Click on create DNS zone and provide the domain name registered.
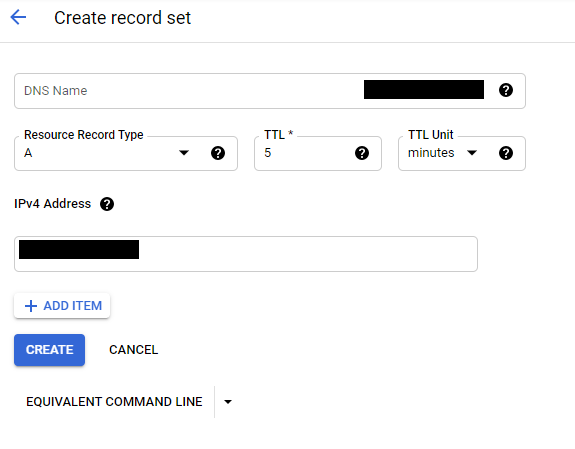
Go to the external IP address on GCP console and it will show an ephemeral IP address for the ingress forwarding rule. Use the drop down and change it to a static IP address.

Note down the IP address and then go to the cloud DNS and add a record set. Update the static IP address for the website and click create.
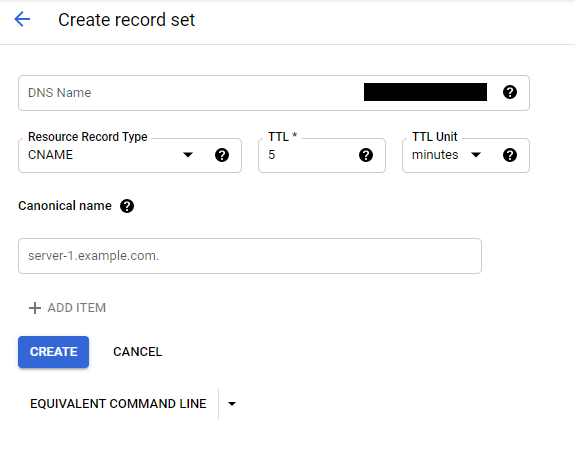
Now lets create a Canonical name record set. For this, add www prefix to the DNS Name field, select the CNAME record type and add your domain name (without www) as the Canonical name.
Last step is to make sure that the domain is pointing to the website created on Google Cloud. For this update the nameservers inside the domain name provider’s account (google domains in my case) with the ns-cloud records from the cloud DNS created.
And voilà!! Website should now be up and accessible via browser.
Closing thoughts:
Cloud computing has made technology accessible to everyone and as you can see we can now build our own website in hours. This website now provides me a platform to write more and write often. Hopefully this will help me improve my writing skills, assimilate my thoughts and learn new things.
I hope you found this helpful. If you have any feedback please do let me know.
PS: GCP resources used in this project are not free therefore if you want to follow this post please make sure to delete all these resources after the project to avoid a surprise bill. I am also not a cyber security expert therefore please review the security and networking aspects of your website and follow the industry best practices to make your website secure.
References:
While working on this project I found the following links and resources useful.
Alok Abhishek
I am a seasoned Product Management professional with blended expertise in software engineering and business administration. My passion lies in building innovative products, exploring new technologies, and deepening my understanding of design, business, and data analytics. I'm committed to applying design thinking and data-driven strategies to create products that resonate with customers, particularly within the realms of cloud computing and machine learning. Outside of work, I enjoy expanding my knowledge in science, technology, and business, as well as hiking, running, and attending concerts.


You May Also Like
Optimizing Product Planning – Simplifying Cloud Cost Modeling using Azure Retail Pricing API
AI’s Potential: Creating a Framework for Driving Product Innovation